QuickBooks Desktop users, especially those on Enterprise v2022, have been facing a critical shipping issue: the old Shipping Manager no longer links to UPS. With the May 31 forced upgrade deadline approaching fast, many businesses are wondering when the new Shipping Manager will be operational, how it works, and how to set it up to avoid disruption.
In this guide, we’ll walk you through everything you need to know about the new QuickBooks Desktop Shipping Manager, why it’s important, and how to get it fully operational in your business.
Why QuickBooks Replaced the Old Shipping Manager
The legacy Shipping Manager in QuickBooks Desktop relied on older carrier APIs to generate shipping labels, calculate rates, and track packages. However, carrier security updates and system changes—especially from UPS—have made the old Shipping Manager incompatible.
As a result, users experienced:
- Missing UPS rate calculations
- Failure to generate shipping labels
- Errors when trying to link sales forms to shipments
- Workflow disruptions for busy shipping departments
To address this, Intuit introduced a new cloud-based Shipping Manager, designed to work with QuickBooks Desktop 2024 and later, offering a modern, secure, and fully integrated shipping experience.
Key Features of the New Shipping Manager
The new Shipping Manager provides several improvements over the legacy version:
- Multiple Carrier Integration – Supports UPS, FedEx, and USPS in one interface.
- Live Rate Comparison – Quickly compare shipping rates across carriers without leaving QuickBooks.
- Real-Time Tracking – Track packages and email customers directly from QuickBooks.
- Label Printing – Print labels in a few clicks, including bulk printing options.
- Shipping History – Access previously shipped packages for easy recordkeeping.
- Cloud-Based Reliability – No more outdated APIs causing failed shipments.
Important Considerations Before Setting Up
Before you begin, note the following:
- The new Shipping Manager does not work in QuickBooks Desktop v2022. Users must upgrade to QuickBooks Desktop 2024 or later to use it.
- Admin privileges are required. Only the Master Admin can enable Shipping Manager.
- Ensure your company file is backed up before starting. This prevents data loss in case of any issues during setup.
- Confirm your carrier accounts (UPS, FedEx, USPS) are active and ready to link.
📞 Tip: If you need help with upgrades, carrier integration, or setup, call 844-753-8012 to get expert QuickBooks support.
Step-by-Step Guide: Setting Up the New Shipping Manager
Step 1: Upgrade QuickBooks Desktop
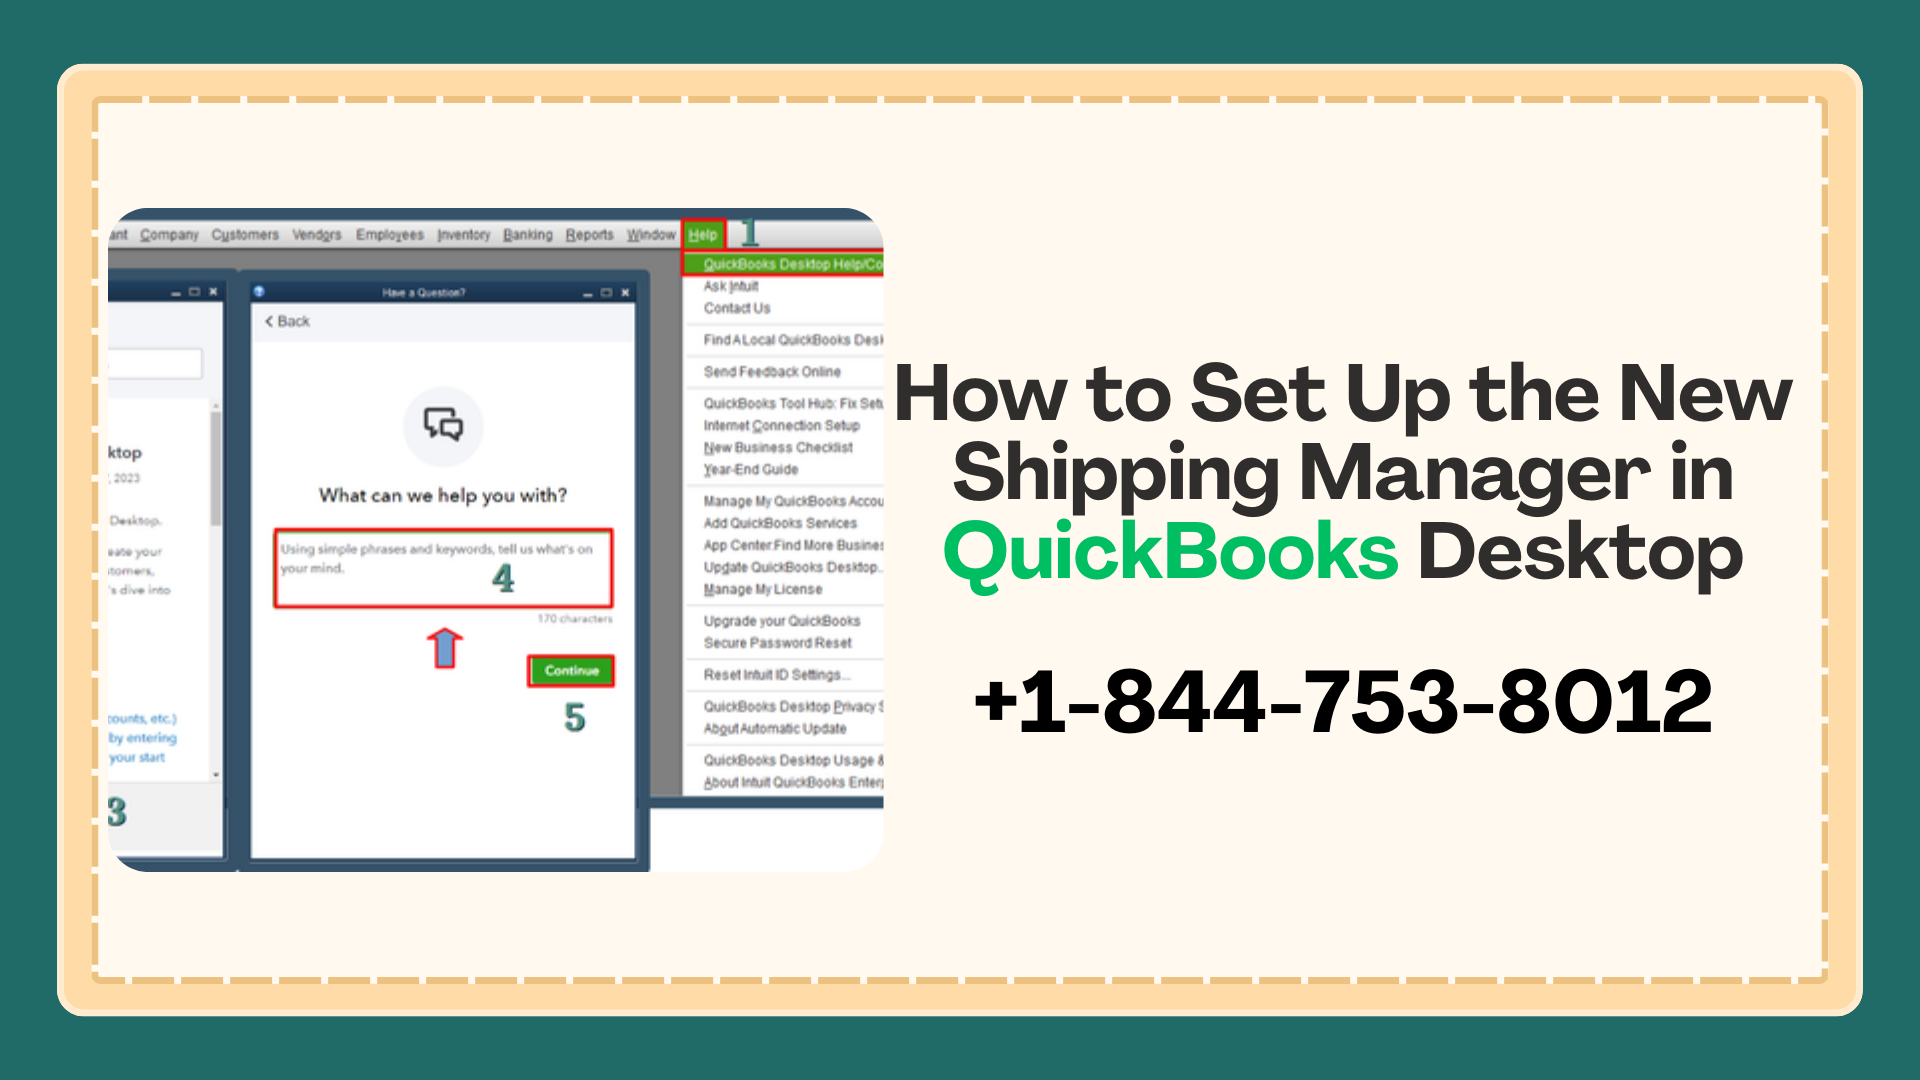
- Go to Help > Update QuickBooks Desktop.
- Install the latest version (2024 or newer).
- Run the program and open your company file to ensure compatibility.
Why it’s important: The new Shipping Manager is only supported in the latest versions, so skipping this step means shipping will not function properly.
Step 2: Verify Your Company File
- Go to File > Utilities > Verify Data.
- Fix any errors using File > Utilities > Rebuild Data if prompted.
Tip: A clean, verified company file prevents errors during shipping setup and ensures accurate order processing.
Step 3: Enable the Shipping Manager
- Go to Edit > Preferences > Shipping.
- Click Company Preferences.
- Select the new Shipping Manager option.
- Click OK to save changes.
Once enabled, you will see the Shipping Manager option in sales forms like invoices, sales receipts, and sales orders.
Step 4: Connect Carrier Accounts
UPS
- Open Shipping Manager.
- Select Add Carrier > UPS.
- Enter your UPS account credentials.
- Authorize QuickBooks to access UPS services.
FedEx
- Repeat the steps above for FedEx.
- Ensure that your FedEx account is active and verified.
USPS / Stamps.com
- Link USPS via Stamps.com if required.
- Add funds to your USPS Shipping Wallet for label purchases.
- Optionally enable auto-funding to prevent balance issues.
Pro Tip: Always test each carrier connection with a single label before printing in bulk.
Step 5: Add Shipping Defaults
- Go to Shipping Manager > Settings > Default Ship From Address.
- Enter your warehouse or office address.
- Choose default packaging, service levels (like Ground, 2-Day), and notification preferences.
Setting defaults saves time when processing multiple orders.
Step 6: Test the Setup
- Create a test invoice or sales order.
- Click Shipping Manager > Create Shipment.
- Verify that rates, labels, and tracking numbers generate correctly.
Tip: Make adjustments if labels fail to generate or rates do not match carrier websites.
Step 7: Training Staff
If you have a shipping team, schedule a short training session:
- Show them how to select carriers
- Demonstrate printing labels and sending tracking notifications
- Teach them to check the shipping history for past shipments
A small upfront training investment reduces shipping errors and improves efficiency.
Aslo Read: Creating a New QuickBooks File After Corruption Issues: What You Need to Know
What If You’re Still on QuickBooks Desktop Enterprise v2022?
Unfortunately, the new Shipping Manager is not available in Enterprise 2022. The old Shipping Manager will stop working after May 31, 2025, which means UPS shipments may fail.
Your options:
- Upgrade to QuickBooks Desktop 2024 or later.
- Temporarily process shipping outside QuickBooks using carrier websites.
- Prepare your company file and accounts for a smooth transition once you upgrade.
For guidance on upgrading and avoiding downtime, call 844-753-8012.
Common Issues and How to Fix Them
1. Labels Not Printing
- Check printer setup in QuickBooks.
- Ensure carrier account is active.
- Try printing a test page.
2. Rates Not Displaying
- Confirm login credentials for UPS, FedEx, or USPS.
- Make sure internet access is stable.
3. Duplicate Shipments
- Always check the Shipping History before creating a new label.
4. Authentication Errors
- Reset carrier passwords if QuickBooks cannot connect.
- Contact QuickBooks support if authentication fails repeatedly.
Best Practices for QuickBooks Shipping
- Always back up your company file before upgrades or shipping setup.
- Verify carrier accounts are active and funded.
- Test with a single shipment before processing multiple orders.
- Train your shipping staff to reduce errors and improve efficiency.
- Schedule upgrades early to avoid downtime before deadlines.
Final Thoughts
The new QuickBooks Desktop Shipping Manager offers improved carrier integration, modern functionality, and cloud-based reliability, but it requires upgrading to QuickBooks Desktop 2024 or later. Businesses still on Enterprise v2022 must prepare for the forced upgrade and ensure UPS and FedEx integration is ready before the May 31 deadline.
Planning ahead, testing the setup, and training staff ensures a smooth transition and uninterrupted shipping operations.
📞 For expert guidance on QuickBooks Desktop upgrades and Shipping Manager setup, call 844-753-8012.
No. The new Shipping Manager requires QuickBooks Desktop 2024 or later. Users on older versions must upgrade.
No. UPS integration in the legacy Shipping Manager has stopped, and it will be completely phased out by May 31, 2025.
You can add UPS, FedEx, and USPS accounts in the Shipping Manager under Settings > Carriers > Add Carrier.
Yes. The new Shipping Manager supports bulk label printing for multiple invoices or orders.
Expert QuickBooks support is available. Call 844-753-8012 for assistance with setup, upgrades, or troubleshooting.