
A user can file Form 1099-MISC using QuickBooks Desktop. 1099-MISC is an information tax form which is filed with IRS and is used to report payments and compensation given to non-employees, that is, to independent contractors or vendors.
This article gives the detailed process to e-file 1099 tax forms and how to prepare them as well.
Users can also resort to seeking help from QuickBooks support. This is also a good option and your issues are effectively handled by QuickBooks online technical help.
How to prepare 1099-MISC Tax Form in QuickBooks Desktop?
-
The first step is to turn on the 1099-MISC feature in your QuickBooks Desktop. To do this follow the steps listed below.
- GO TO Edit Menu > Select Preferences.
- Select Tax-1099 on the left.
- Click on Company Preferences Tab.
- Select Yes, when a message prompts asking you that ‘Do you file 1099- MISC Forms?’
- Select OK to save preference.
-
Next step is to add a new vendor.
- Choose vendors > Click on Vendor Centre > Click on New Vendor drop-down
- Select on the New Vendor from the drop-down.
- In the Vendor Name Field, enter the name of the vendor which would appear in the list.
- Fill in the required information. Click OK.
-
In QuickBooks Desktop, set up vendors/independent contractors to receive form 1099-MISC.
- Select Vendors > Click on Vendor Centre.
- Do right click on vendor’s name and select Edit Vendor.
- Select the Address Info tab and validate data.
- Click on Tax settings button.
- Tick-mark the Vendor eligible for 1099.
- Enter tax Id Number in Vendor’s Tax ID Field. Select OK.
- Repeat steps for every eligible vendor.
-
The user needs to set up an expense account for payments to Vendors.
- Select Edit > Click on preferences.
- Select Tax-1099 from the left.
- Click on Company Preferences Tab.
- Select Yes, when a message prompts asking you that ‘Do you file 1099- MISC Forms?’ Select OK to save preference.
- Click on the Click Here link, when a message prompts asking that ‘If you want to map your account to boxes on Form 1099-MISC, Click here.
- QuickBooks 1099 wizard gets open.
- The QuickBooks desktop account to track payments to a user’s 1099 vendors will be listed. In the apply payments to this 1099 box column, choose the correct 1099-MISC box.
- Select on the 1099-MISC box for each listed account or select omit these payments from 1099.
- Select save and close when the accounts have been mapped.
How to setup Tax1099 E-Filing service?
The below-listed steps need to be undertaken by new users in order to set up E-Filing Service.
- Complete the setup of QuickBooks desktop 1099 wizard.
- A user needs to create a Tax1099 account.
- A user needs to download the Tax1099 plugin.
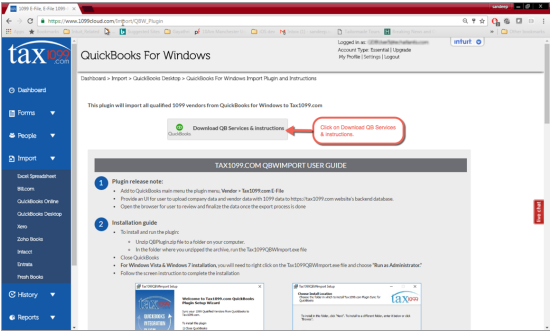
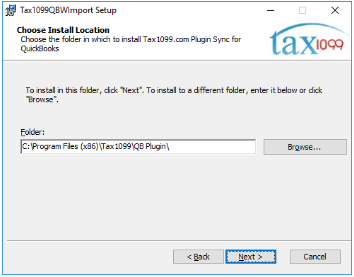
- Now, a user needs to install the Tax1099 plugin.
How to E-File 1099-MISC Tax form?
- When you have installed the plugin, you will be now able to upload your 1099 information from QuickBooks desktop to Tax1099.com. Below are the steps to begin uploading.
- Select Tax1099.com E-File from the Vendors menu.
- Click on upload 1099 data.
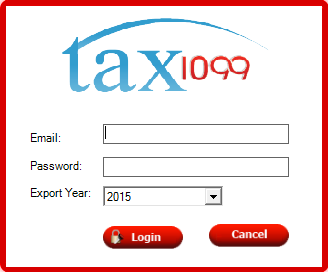
- A user needs to enter Tax1099.com login information. Choose the payment year you want to export. Select the login button.
- During the export process, a dialogue box is shown which displays the current export status. After the upload has completed, the window closes automatically. If it closes, click the x button manually.
- A user needs to review and update the vendor information in Tax1099.com dashboard.
- A user needs to choose the method for distributing copies to the vendor.
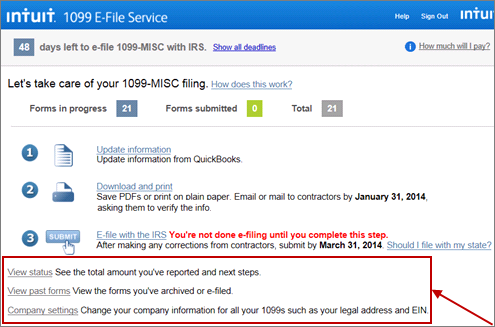
- Click on calculate Fee to see the Total Filing Fee. Once all billing information has been entered, Click on pay and submit to E-File.
If the problem persists and a user is not able to solve the issue, contact Quickbooks Desktop Support Number 1-888-487-1720 for immediate assistance.